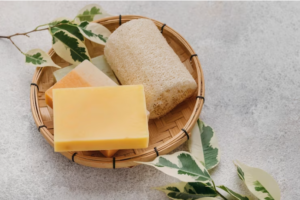
Are you tired of using commercial soap that contains harsh chemicals and synthetic fragrances? Why not make your own organic soap? Not only is it better for your skin, but it’s also a fun and rewarding DIY project.
In this article, you’ll learn how to make your own organic soap from scratch using natural ingredients and essential oils.
Before we get started, let’s talk about the benefits of organic soap. Unlike commercial soap, which often contains sulfates, parabens, and other harmful chemicals, organic soap is made with natural ingredients that are gentle on your skin. It’s also better for the environment, as it doesn’t contain any synthetic fragrances or artificial colors.
By making your own organic soap, you can customize it to your liking and ensure that you’re using products that are safe and healthy for you and your family. So let’s get started on this fun and easy DIY project!
Understanding the Benefits of Organic Soap
You’ll be amazed at the incredible benefits that come with using organic soap – it’s a game-changer for your skin and overall health.
Organic soap is made from natural ingredients and doesn’t contain harsh chemicals or synthetic fragrances. This means that it’s gentle on your skin and doesn’t cause any irritation or allergic reactions.
Unlike conventional soap, which can strip your skin of its natural oils, organic soap helps nourish and moisturize your skin, leaving it feeling soft and smooth.
If you have sensitive skin, organic soap is the perfect choice. It’s free from harsh chemicals and gentle on your skin, making it less likely to cause any irritation or allergic reactions. Organic soap also contains natural ingredients that help soothe and calm your skin, reducing redness and inflammation.
By switching to organic soap, you can enjoy the benefits of a gentle and effective organic soap that’s kind to your skin and the environment.
Gathering Your Supplies and Ingredients
Before starting, it’s important to have all the necessary supplies and ingredients on hand for creating a natural and eco-friendly cleansing organic soap. Sourcing materials is the first step in this process.
Look for organic and sustainably sourced ingredients, such as coconut oil, shea butter, and essential oils. These can be found at health food stores, online retailers, or even at your local farmer’s market.
Make sure to also have the necessary equipment, such as a digital scale, mixing bowls, and a silicone soap mold. It’s also important to take safety precautions when making soap.
Wear protective clothing, such as gloves and an apron, and use caution when handling lye, as it can cause chemical burns. Keep children and pets away from the workspace and ensure proper ventilation.
With the right supplies and precautions, making your own organic soap can be a fun and rewarding DIY project.
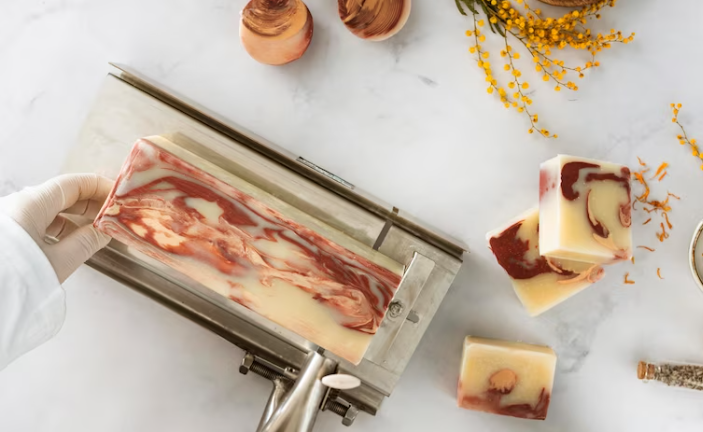
Mixing and Pouring Your Soap
Mixing and pouring the soap is the next step in creating a natural cleansing bar, and it’s important to follow the recipe carefully to ensure the soap sets properly.
Start by choosing mold options that suit your preferences. Silicone molds are a popular choice as they’re easy to use and release the soap easily. You can also use plastic containers, but be sure to line them with parchment paper or plastic wrap to make it easier to remove the soap.
Before you start mixing, it’s important to keep soap making safety tips in mind. Always wear gloves and goggles to protect your skin and eyes from the lye solution. Make sure your workspace is well-ventilated and keep any children or pets away from the area.
Once you have your safety precautions in place, start mixing the ingredients together according to the recipe. Pour the mixture into your chosen mold and let it set for 24-48 hours.
After it has set, remove the soap from the mold and cut it into bars. Congratulations! You’ve made your own organic soap.
Customizing Your Soap with Essential Oils
Enhance the natural benefits of your soap by adding a personalized touch with essential oils. Essential oils not only provide a pleasant scent, but also offer additional therapeutic benefits such as relaxation, stress relief, and skin nourishment.
When selecting your essential oil blends, consider the specific benefits you want to add to your soap. For example, lavender oil is known for its calming properties, while tea tree oil has antibacterial and anti-inflammatory effects.
To customize your soap, start by adding a few drops of your chosen essential oils to the soap mixture during the mixing process. The amount of oil you add will depend on the desired strength of the scent and therapeutic benefits. It’s important to mix well and evenly distribute the oils throughout the soap mixture before pouring it into your molds.
You can also add dried herbs or flowers for a natural touch. With a little experimentation, you can create a unique and personalized soap that not only cleanses, but also nourishes and uplifts your mind and body.
Curing and Storing Your Homemade Soap
Once your soap is poured into its molds and left to cure, it’s like a delicate flower that needs time to blossom and develop its full potential. The curing process can take anywhere from a few weeks to a few months, depending on the ingredients used and the desired hardness of the soap.
During this time, it’s important to keep your soap in a dry, cool, and well-ventilated area. Avoid exposing it to direct sunlight or extreme temperatures, as this can cause the soap to sweat or melt. As your soap cures, it will gradually become harder, milder, and longer-lasting.
You can test its readiness by pressing on the surface with your finger – if it leaves a slight indentation, the soap needs more time to cure. Once your soap is fully cured, store it in a dry and airy container, away from moisture and humidity.
You can wrap it in wax paper or store it in a cloth bag to protect it from dust and dirt. With proper care and storage, your homemade soap can last for months and provide you with a luxurious and eco-friendly cleansing experience.
Frequently Asked Questions
What are the precautions that should be taken while handling lye?
When working with lye, there are important safety tips to keep in mind.
First and foremost, always wear protective gear such as gloves and goggles to prevent accidental contact with your skin or eyes.
It’s also important to work in a well-ventilated area to avoid inhaling any fumes.
When adding lye to water, always add the lye slowly and gradually to prevent splashing.
And finally, make sure to keep a container of vinegar nearby in case of accidental spills, as vinegar can help neutralize the effects of lye.
Remember, taking these precautions is crucial to ensure your safety when handling lye.
Can I use any type of essential oil in my soap or are there specific ones that work better?
When it comes to selecting essential oils for your soap fragrance blends, it’s important to keep in mind that not all oils are created equal. Certain oils work better than others when it comes to creating a long-lasting and pleasant scent in your soap.
Lavender, peppermint, and citrus oils are popular choices for their fresh and invigorating scents, while floral oils like rose and jasmine add a touch of elegance.
It’s also important to consider the strength of the oil and how it will blend with other scents in your soap.
With careful selection and experimentation, you can create a unique and delightful fragrance blend for your soap.
How long does it take for the soap to cure completely?
Do you know how long it takes for soap to cure completely? The curing duration can vary depending on the recipe and ingredients used, but on average it takes about 4-6 weeks for handmade soap to fully cure.
During this time, the soap will harden and become more long-lasting. The longer you let the soap cure, the harder it will become and the longer it will last.
So, if you want your soap to be hard and long-lasting, be patient and let it cure for a few weeks before using it.
Can I use tap water instead of distilled water for making soap?
Using tap water instead of distilled water for soap making may seem like a simple solution, but it’s important to consider the potential consequences.
Tap water can contain minerals and impurities that can interfere with the soap making process and affect the final product. These impurities can cause discoloration, texture issues, and even affect the soap’s ability to lather.
It’s recommended to use distilled water for soap making to ensure the best possible outcome. However, if distilled water is not available, you can use tap water as long as you filter it first or let it sit for a few hours to allow any sediment to settle at the bottom.
Remember, the quality of your water can make a big difference in the quality of your soap.
How can I prevent my soap from sweating or getting too soft?
Preventing soap sweat can be frustrating, but there are tips and tricks to prevent it.
Choose the right soap mold, considering material, size, ventilation, and temperature.
Additives such as kaolin clay or arrowroot powder can help absorb excess moisture.
Store soap in a cool, dry place to prevent it from getting too soft.
Remember, “An ounce of prevention is worth a pound of cure.” Take these steps to prevent soap sweat and enjoy long-lasting bars of soap.
Conclusion
Congratulations! You’ve successfully made your own organic soap. By choosing to use natural ingredients, you’ve contributed to a healthier and more sustainable planet.
The process of making soap can be a symbol of personal empowerment and mindfulness. Taking the time to create something from scratch can be a meditative experience, allowing you to focus on the present moment and enjoy the process of creation.
Not only does your homemade soap benefit the environment and your mental well-being, but it also benefits your skin. Organic soap is gentle on the skin and free from harmful chemicals that can cause irritation and dryness.
By using essential oils to customize your soap, you can create a unique scent that enhances your mood and promotes relaxation. Use your soap with intention, and let it be a reminder to treat yourself with care and kindness.